Hassle-free Hotspot Management with WiFi Voucher Authentication
WiFi Voucher Authentication
WiFi voucher authentication is one of the cloud authentication methods offered in Nebula Professional Pack. It allows WiFi clients to have Internet access for a specific period of time using a unique code generated by Nebula Control Center (NCC). Each created voucher can be printed and handed out to the customers for use. Since each WiFi client uses a different code to access the Internet, it provides stronger security and protection than just using a shared password, making it an easy and secure WiFi onboarding method for hotspot management.
This feature is particularly useful in retail and hospitality settings like coffee shops, cafeterias, or hotels where the service providers charge for the WiFi connection. The WiFi access can be offered to a customer using a voucher code for each demand. The customer pays for the time period he/she wishes to use the WiFi service and he/she will get a voucher code to access the Internet. The voucher with expiration time will start counting down the moment the user is successfully connected to the Internet the first time and once the voucher expires, the client can no longer connect to the Internet.
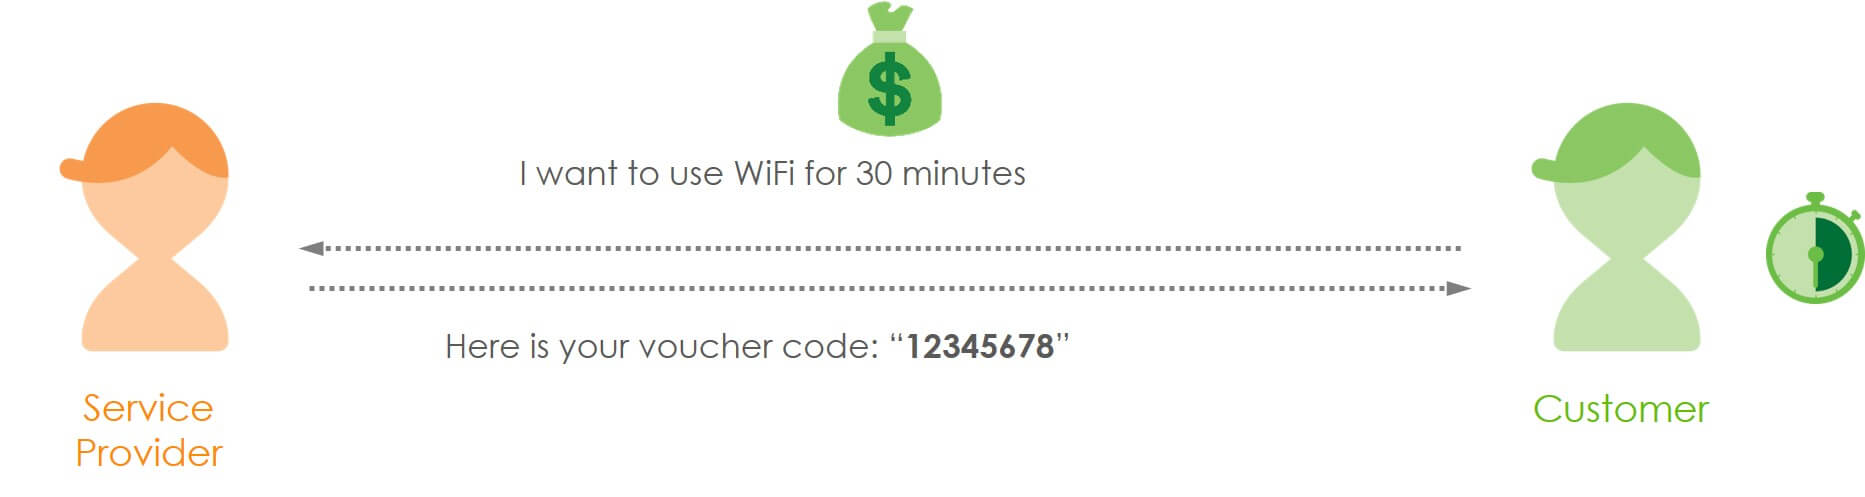
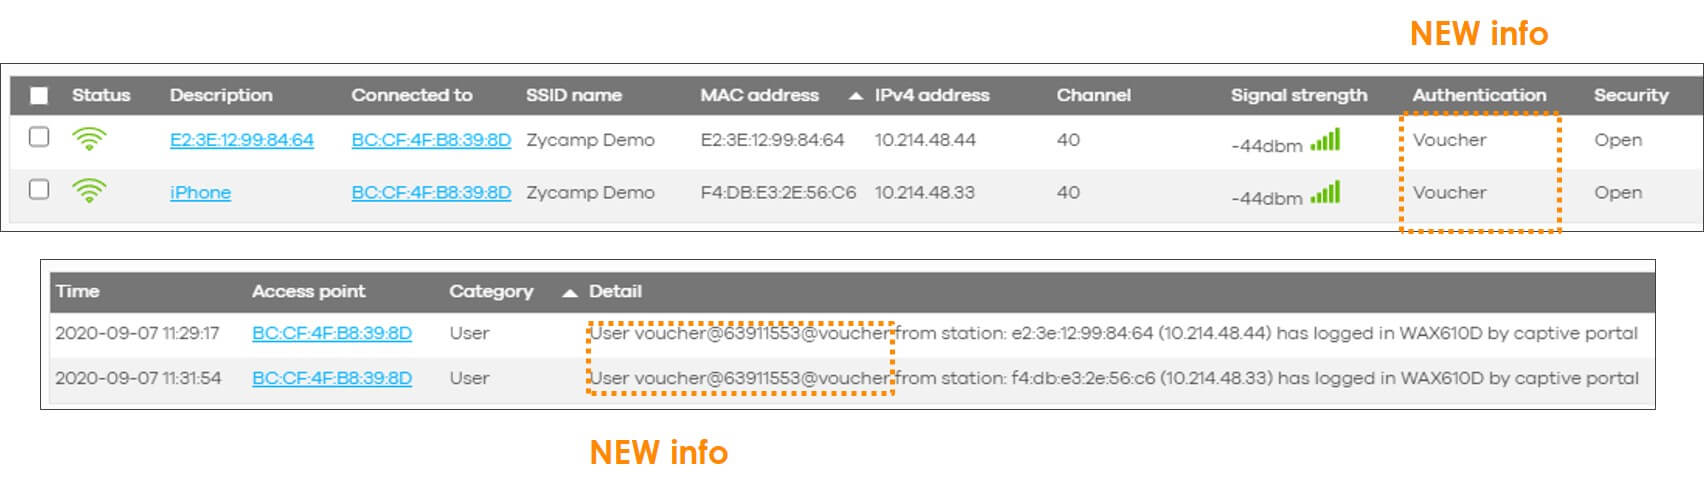
Image 1: Using WiFi voucher on NCC for simple WiFi onboarding.
How to Use WiFi Voucher for Simple WiFi Onboarding?
Follow the simple steps below to complete the WiFi configurations and voucher creation and settings in NCC.
First, we need to configure the voucher sign-in method on the authentication page of the selected SSID.
Please note that the voucher will also follow all the other configurations on the same authentication page, such as reauth. time, wall garden, rate limiting, https bypass … etc.
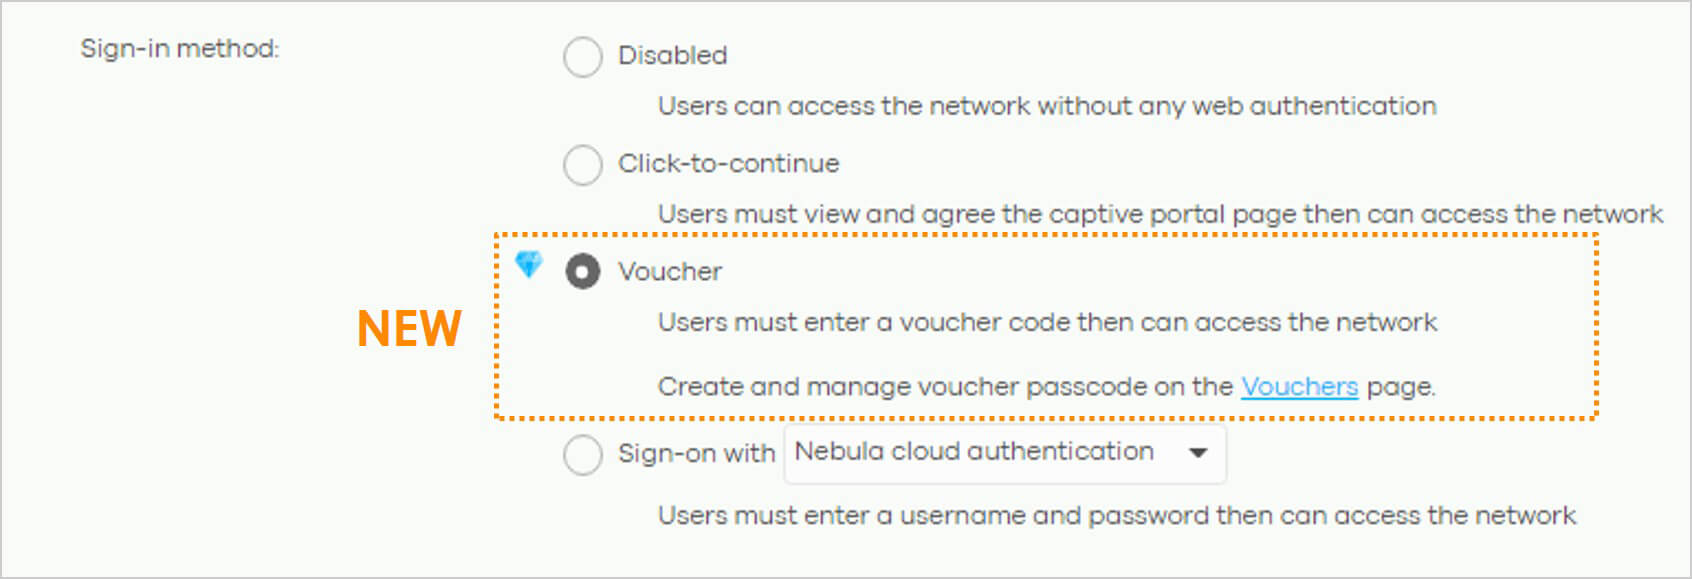
Image 2: Selecting Voucher as the sign-in method
The voucher feature is one of the captive portal applications in Nebula, the use of the voucher feature needs to be combined with a captive portal; thus, the next step is to set up a captive portal page.
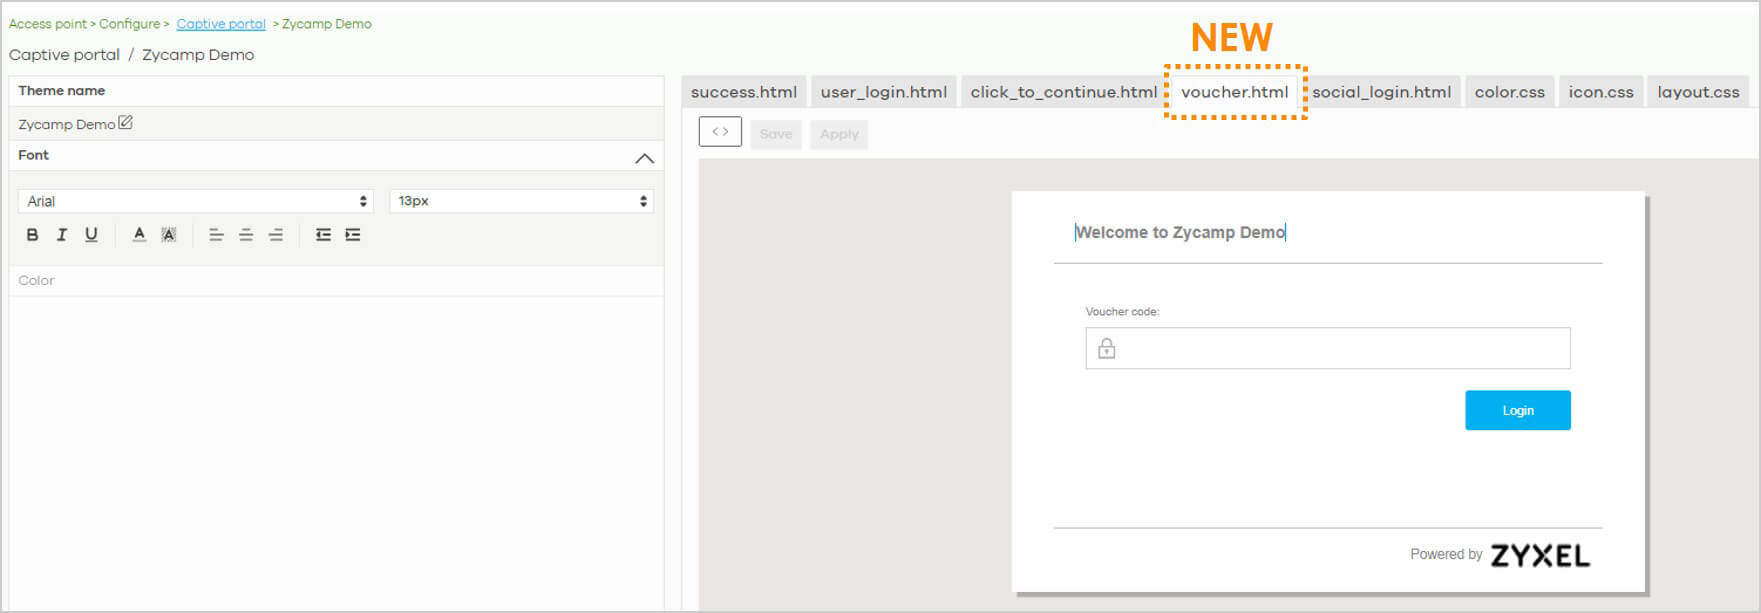
Image 3: The use of voucher feature as WiFi authentication needs to be combined with a captive portal
After setting up the captive portal, we can go to “Voucher settings” page to set up the information that you want to be included in the voucher print-out
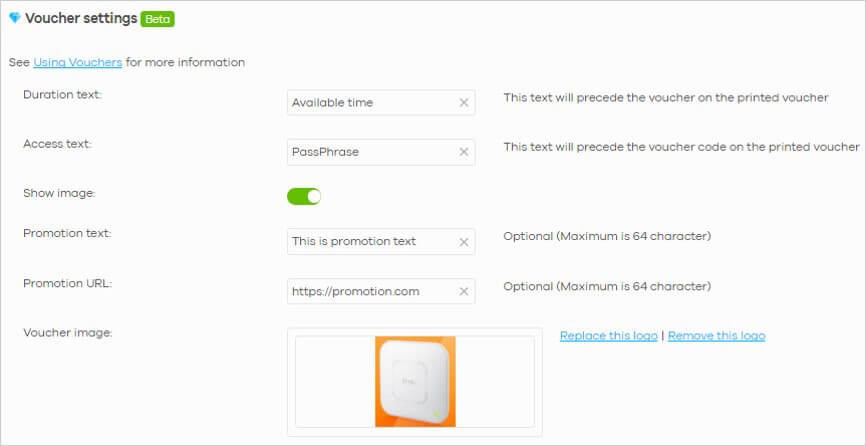
Image 4: Editing the info included in the voucher print-out by using voucher settings
Once the info is added in the voucher settings, we can go ahead to create a new set of vouchers and print-out.
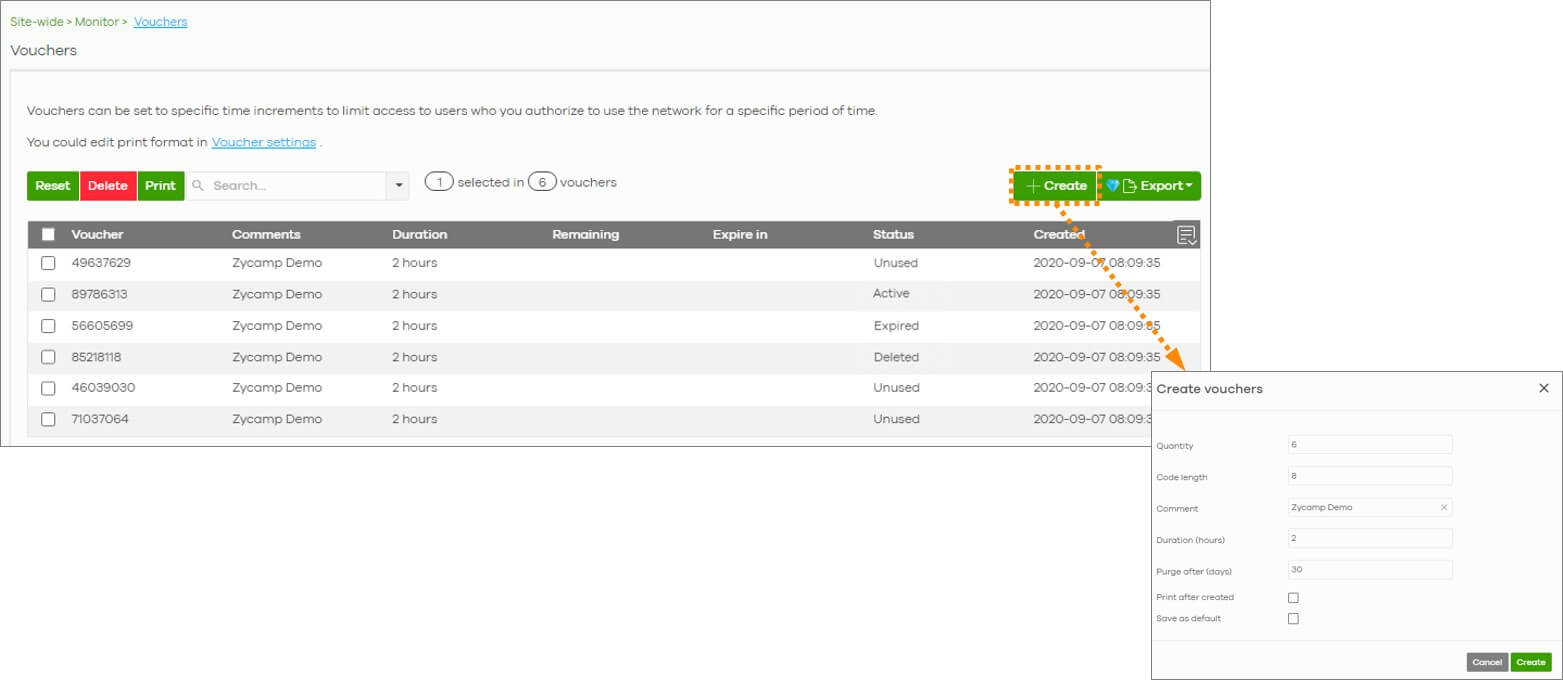
Image 5: Creating vouchers by filling out the required fields
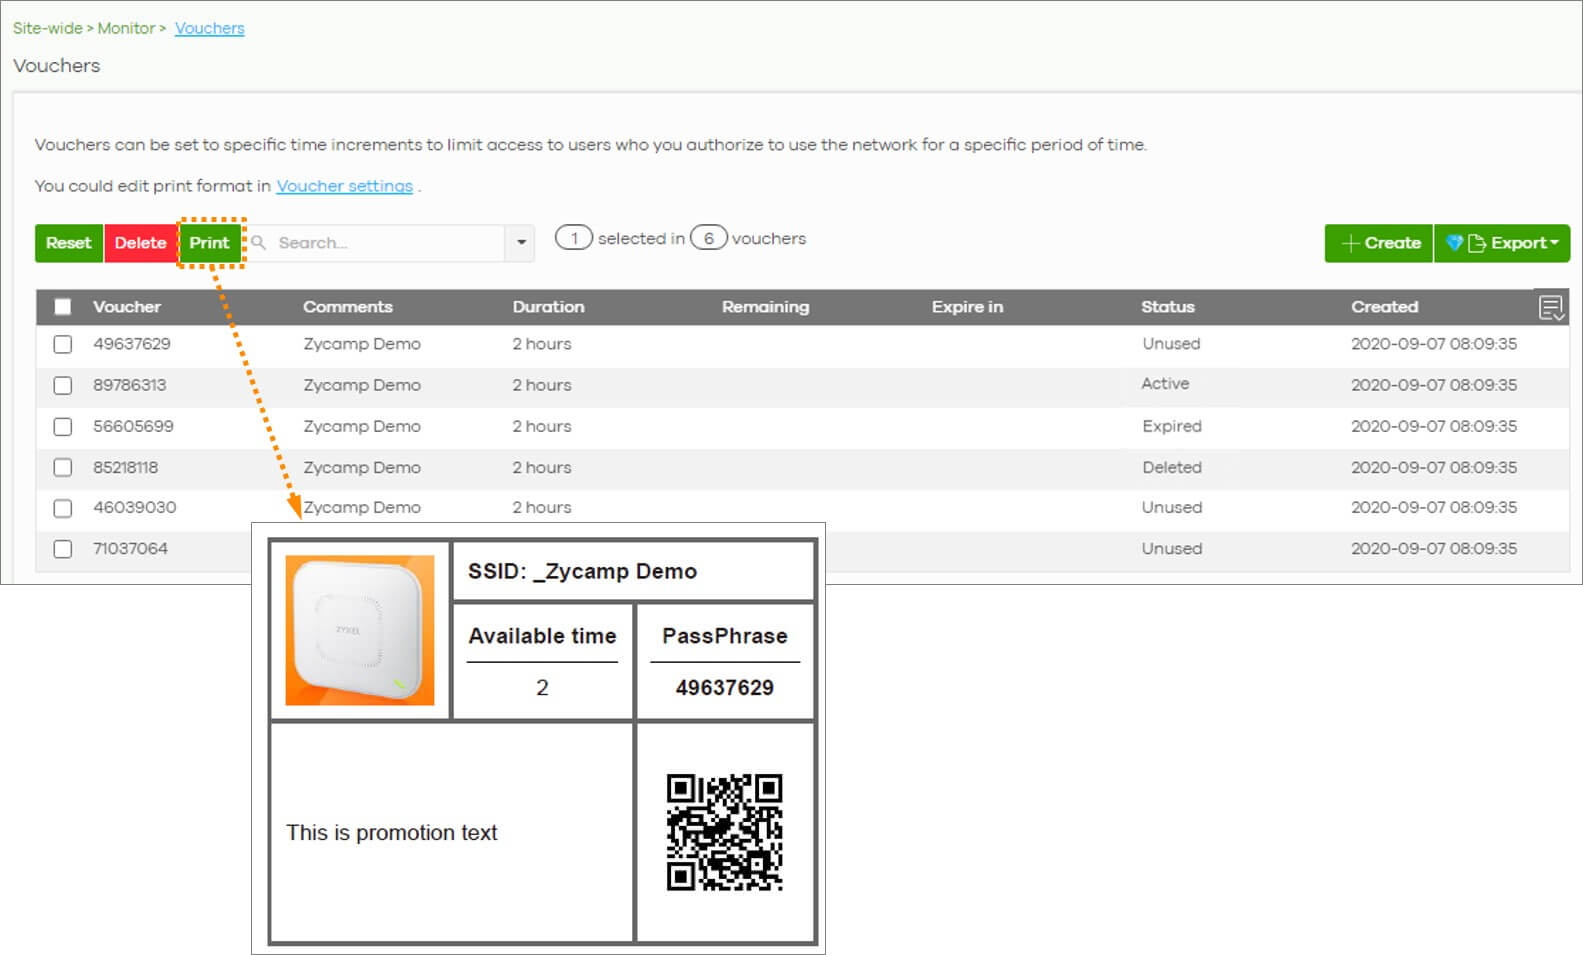
Image 6: Printing out the voucher
- Set up WiFi authentication – voucher type: Go to Access point > Configure > Authentication > [Select a SSID] > Sign-in method
Under the Sign-in method, select “Voucher”. - Set up a captive portal page: Go to Access Point > Configure > Captive Portal > [Portal Theme]
A customized captive portal can be set up nicely using the built-in design tools, which includes a new voucher html template. - Voucher settings: Go to Site-wide > Configure > General Settings > Voucher settings
Besides the essential information like Duration text and Access text, other info can be included in the voucher print-out by adding an image, promotional text, and promotional URL. - Create a new voucher: Go to Site-wide > Monitor > Vouchers > + Create
On this page, click the + Create button, a separate window will pop out. Fill in the required fields, such as how many vouchers you want to create at a time (Quantity), how complex the password code you want it to be (Code length), how many hours of the WiFi access (Duration), and how many days of the voucher will be kept on the voucher list (Purge). - Print voucher: You can click on the checkbox print after created and the voucher will be automatically printed out once you hit the “Create” button. Or, you can also go back to the voucher list, select the created voucher you want to print on the voucher list, and then hit “Print”. The printed voucher can then be distributed to the paid customer.
Differences Between WiFi Voucher and DPPSK
The WiFi voucher feature and Dynamic Personal Pre-Shared Key (DPPSK) share many similarities as they are both great functions offered in Nebula for easy and secure WiFi onboarding; however, they are still different in many aspects. Here, we’ve prepared a comparison table to help you better understand the differences between WiFi voucher and DPPSK. You may select the appropriate authentication method based on your network needs and situation.
| DPPSK | Voucher | |
|---|---|---|
| Target Users | Shared offices, Schools, Hotel Conference rooms, Exhibition/Convention centers … etc. | Coffee shops, Cafeterias, Airports, Hotel lobby … etc. |
| Authentication Layer | L2 (AP Radio) | L3 (Web Captive Portal) |
| Data Traffic Encryption | Yes | No |
| Dynamic VLAN Assignment Support | Yes | Yes |
| AP Models Support | Only some newer models | All |
| User Identification/Management | Yes | No |
| Client Device Configuration User Experience | Multiple options, either key in or scan QR code when it is integrated with the 3rd party Onboarding System into O/S | Simple, key in into Web Captive Portal |
In addition, for small business owners who need a simple method to set up their WiFi network protection, Nebula also offers Connect & Protect AP Security Service (CNP) to protect their networks against dangerous or malicious internet traffic, such as phishing attacks, malware downloads or harmful/malicious website accesses.
Check here to find out more about CNP: here.